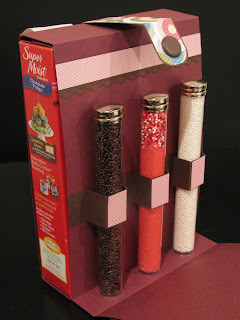
This particular one is for my niece who is turning 5 tomorrow! We're snowed in, so I'll be late sending it to her, but that's ok - she'll have plenty of birthday cake tomorrow I'm sure. Her mom says she's requested a 6 layer rainbow cake; Kambree is hilarious!
The Take Along opens up to reveal some darling tubes filled with sprinkles. You can purchase the tubes online here. I thought about tying some bows onto the tubes, but I managed to restrain myself. No need to make it gaudy :)
I used a funnel to pour the sprinkles in - super fast and easy!
Kambree is such a girly girl - so of course I had to use glitter and lots of pink! I made this cupcake using My Digital Studio (MDS) as a template. Here's how I did it:
First, I opened up a new page in MDS and chose this cupcake stamp. Because it's a stamp, I can enlarge the image as much as I want without distortion. After I enlarged it, I printed out the page and cut out the image. Then I traced around the template onto my cardstock. You can do this with any bold image stamp in MDS. It opens up a world of possibilities!
To get the sprinkles on just right, I used my hobby blade to cut out the shapes from my original template, then used some Dotto adhesive to keep it on the cardstock. Using a sponge dauber, I rubbed ink over the image. I used pink ink because I was planning to use pink glitter and the ink would be hidden when I was finished. The picture above shows what the cardstock looked like after daubing ink on. After that it was simple to put the glue where I needed it. I used Tombow glue - it has two applicators and the small side worked perfectly for this.
Here's what the finished product looked like. I used Chunky glitter first and then sprinkled on some Cosmo glitter to fill in the small spots in-between. I also used my sponge dauber to add some ink around the edges of the white cardstock so that it would stand out a bit from the pink DSP.
I used a Jumbo Brad for the front of the flap, but there will be a magnetic closure on the back of the flap to keep it shut, so I had to get rid of the prongs on the back of the brad. Here's how I did it:
I used a pair of wire cutters - this takes a little bit of effort, but it's not too hard.
Make sure you cut enough off so that it doesn't leave pointy edges sticking up. This will help it to lay flat.
Then I used a Glue Dot to adhere it to the front of the flap. That's it! Pretty easy. Now the back of my flap is ready for me to put on the magnet and the brad won't get in the way :) *I don't have pictures of the magnets because I had to order them online and they haven't arrived yet.
Once again, here's the finished project:
Super fun! I've already bought more tubes so that I can make them for the kids in my Primary class. One little boy just had a birthday last week, so when this snow clears up I can take one over to him. I think it'll be a hit!


3 comments:
Extra cute, cake box, what a great snow day project. I've been wanting to make a cake box project too! All I need now is a snowy day - which we haven't had this year
no snow?! I can't believe it! If I could pack up our snow and send it to you I would :)
Very cute project! Great for Visiting Teaching, too!
Post a Comment